
Setting up DKIM keys used to be one of those tasks you could put off until “later.” Well, later has arrived.
With Google, Microsoft, and Yahoo’s sender requirements, proper DKIM signing isn’t just a nice-to-have anymore—it’s non-negotiable for getting your emails delivered.
But here’s the thing: setting up DKIM keys is only half the battle. If you’re like most organizations, you’ve probably got a few questions:
- How often should you really rotate your keys?
- What happens if you mess up the rotation process?
- Are your current keys strong enough?
- What if your keys get compromised?
The good news? DKIM key management doesn’t have to be the headache it used to be. Whether you’re setting up DKIM for the first time or looking to establish a solid key rotation practice, this guide will walk you through everything you need to know.
And if you’re thinking “I already have DKIM set up, I can skip this”—you might want to stick around. Email authentication requirements have evolved, and what worked in 2023 may not suffice in 2025. Those 1024-bit keys that used to be standard? They’re quickly becoming yesterday’s best practice as more providers push for stronger encryption.
We’ll cover everything from initial setup to automated rotation with clear step-by-step directions. No unnecessary jargon, no complicated theory, just practical steps to keep your email authentication strong and your deliverability healthy.
Understanding DKIM key basics
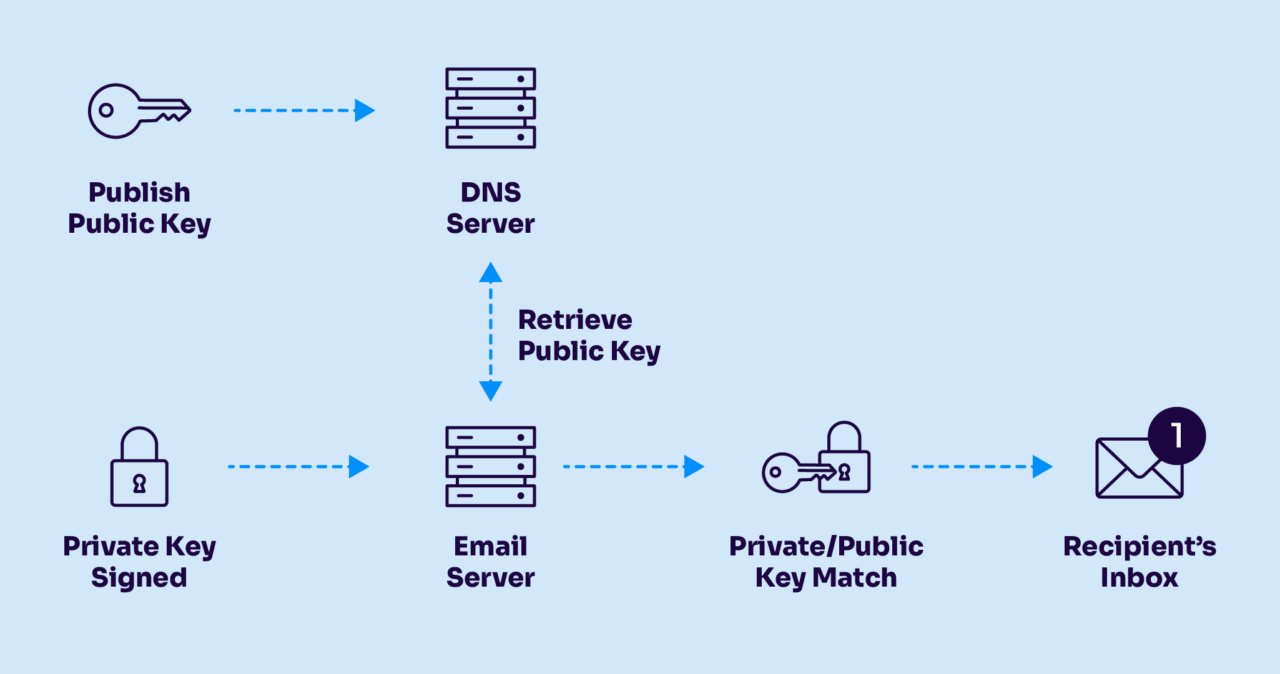
DKIM (DomainKeys Identified Mail) is your email’s digital signature. Just like you wouldn’t send an important contract without signing it, your emails need this signature to prove they’re really from you.
Here’s what makes up a DKIM signature:
- Private key that lives on your email server (keep this one safe!)
- Public key that sits in your DNS records (this one’s visible to everyone)
- Selector, which is basically a label that helps find the right public key
Here’s how it works. When your email server sends a message, it uses the private key to create a unique signature based on the email’s content. The receiving server uses your public key to verify that signature. It’s like having a lock and key pair—except in this case, thousands of receiving servers might need to check that lock every day.
Before you start: DKIM key prerequisites
Before diving into key generation, make sure you have:
- Access to your DNS records (or someone who does)
- Administrative access to your email sending infrastructure
- A plan for storing your private keys securely
- A way to track your key expiration dates (trust us, you’ll thank yourself later)
And here’s something people often overlook: if you’re using multiple email service providers (ESPs), you’ll need separate DKIM keys for each one. That marketing newsletter going through Mailchimp? It needs different keys than your customer service emails going through SendGrid.
Setting up DKIM keys: step-by-step
1. Generating your DKIM key pair
Remember when 1024-bit keys were the gold standard? Those days are gone. Here’s what you need to know about key strength in 2025:
- 2048-bit RSA keys are now the minimum recommended length
- Some providers are already testing 4096-bit keys
- Ed25519 keys are gaining traction (they’re shorter but just as secure)
Here’s how to create them. You’ve got options here. If command-line tools make you break out in a cold sweat, don’t worry—there are plenty of alternatives:
- OpenSSL (for the command-line comfortable)
- Web-based DKIM generators (convenient but use with caution)
- Your ESP’s built-in tools (if available)
- Email authentication platforms (they handle the technical bits)
And before moving forward, verify that your key pair:
- Actually matches (you’d be surprised how often they don’t)
- Uses the right algorithm (RSA is still king, but watch this space)
- Has the correct length (remember: 2048 bits minimum)
2. Adding the public key to your DNS
This is where things often go sideways. One misplaced character in your DNS record can send your DKIM implementation straight to the “invalid signature” graveyard. Let’s break it down:
Your DKIM record needs to live at a specific address in your DNS. The format looks like this:
selector._domainkey.yourdomain.comDon’t just copy-paste that—replace “selector” with your actual selector name (like “mail” or “key1”) and “yourdomain.com” with your actual domain.
Your public key needs some specific formatting in DNS:
- Strip out headers and footers from the key
- Remove all whitespace and line breaks
- Add the correct TXT record tags
- Keep an eye on those quotation marks (they matter)
3. Implementing the private key
This is the part you absolutely don’t want floating around in someone’s inbox or posted on a public wiki (yes, we’ve seen both happen). Your private key is like the master key to your email kingdom. Here’s how to keep it safe:
- Store it in a secure key management system—not in a text file named “DKIM_KEY.txt” on your desktop
- Limit access to only the people and systems that absolutely need it
- Keep backups, but treat them with the same level of security as the original
- Document where it’s stored (but not the key itself) in your security procedures
Pro tip: If you’re using multiple mail servers, each one needs access to the private key. Consider how you’ll distribute and update these keys securely before you start implementing.
Now, your email servers need to know three things:
- Where to find the private key
- Which selector to use
- What parts of the email to sign
Most EPSs will handle the private key storage and implementation, but it’s still good to understand where (and how) they’re using your domain. All you’ll typically need to do is add your ESP’s provided public key to your DNS.
DKIM key rotation: why and when
Remember when we all used the same password for everything and never changed it? (Some of you are nervously looking at your “Password123” right now, aren’t you?) Well, DKIM keys are kind of like passwords—they need regular updates to stay secure. Here’s why:
- Keys can be compromised (even if you don’t know it happened)
- Older keys might use outdated encryption standards
- Your email volume might have outgrown your current key strength
- Some team members who had access to the keys might have left
- Requirements and best practices keep evolving
When should you rotate your DKIM keys?
Don’t wait until your keys are about to expire or until Google sends you a scary warning. Set up a reminder system—your future self will thank you. Here’s a practical timeline for rotating your DKIM keys:
- Minimum: Every 12 months (mark your calendar)
- Ideal: Every 6 months (if you’ve got the process down)
- Immediately if:
- You suspect a security breach
- A team member with key access leaves
- You’re upgrading your email infrastructure
- You notice any unusual email delivery issues
You can (and should) have two active keys at once during rotation. Think of it like changing the locks on your house—you want the new lock installed before you throw away the old keys.
Most DNS providers support multiple DKIM records using different selectors:
key1._domainkey.yourdomain.com
key2._domainkey.yourdomain.com
This approach lets you:
- Test new keys before retiring old ones
- Avoid any downtime during rotation
- Roll back quickly if something goes wrong
Step-by-step key rotation process
1. Preparation phase
First things first: you need your new keys ready to go before you touch the old ones.
- Generate your new key pair using current standards (2048-bit minimum in 2025)
- Choose a new selector name (not the same as your current one)
- Test the keys offline before you go anywhere near your production system
- Triple-check that your public and private keys match (seriously, do it)
Pro tip: Name your selectors something meaningful like “jan2025” instead of just “key1.” Future you will appreciate knowing when the key was created without digging through documentation.
2. Implementation phase
This is where the parallel key approach pays off:
- Add your new DKIM record with a different selector
- # Example: If your old record was key1._domainkey, your new one might be:
- jan2025._domainkey.yourdomain.com
- Wait for DNS propagation (it takes a little bit of time)
- Verify the new record is visible worldwide (use multiple DNS checkers)
Now comes the smooth part:
- Configure your email server to sign with both keys
- Start with a small percentage of your email flow
- Gradually increase the volume using the new key
- Keep the old key active, but reduce its usage
Pro tip: Send test emails to multiple providers (Gmail, Yahoo, Outlook, etc.) during this phase. Each one might handle the transition slightly differently.
3. Completion phase
Once you’re confident the new keys are working (usually after 24-48 hours of successful parallel operation):
- Update your email server to use only the new key
- Monitor for any issues for at least a few hours
- If all looks good, remove the old DNS record
- Keep the old private key in your secure backup for a few more days
If anything goes wrong during any phase, you can always roll back to your old key—that’s why we kept it around during the transition. It’s like having a spare tire. You hope you won’t need it, but you’ll be glad it’s there if you do.
How to verify your DKIM is working
First, let’s do some basic verification. Send a test email to yourself at a Gmail account and check the headers. (Don’t worry, we’ll show you how to find those cryptic-looking headers in a second.)
Look for these signs:
- A header that starts with “DKIM-Signature”
- Authentication-Results showing “dkim=pass”
- Your domain and selector in the signature
If you’re thinking “headers what now?”—don’t worry. Here’s how to find them:
In Gmail:
- Open your test email
- Click the three dots (⋮) next to the reply button
- Select “Show original”
In Outlook:
- Open your test email
- Click File → Properties
- Look for “Internet headers”
You can also check your current DKIM status for free with Valimail Monitor. All you need to do is create a free Monitor account (no trials or credit cards required).
Automate your DKIM management with Valimail
Managing DKIM keys manually might have worked in the past, but “set it and forget it” doesn’t cut it anymore. From key length to rotation schedules to deprecated keys lingering in DNS, there’s a lot that can go wrong. And every misstep opens the door to phishing, spoofing, and failed delivery.
That’s why we built our DKIM Continuous Protection—a new enterprise feature in Valimail Enforce that gives you a real-time, centralized view of every DKIM key across your domain landscape, complete with automated alerts and direct controls.

Here’s what you get:
- A dashboard showing the age, strength, and last use of every key
- Warnings for keys that are expired, unused, or below the recommended 2048-bit length
- Instant visibility into which selectors and sending platforms are tied to each key
- Safe recommendations on when to retire or rotate keys
- One-click edit and delete actions for key management at scale
With this feature, you no longer have to rely on spreadsheets, manual DNS checks, or outdated key tracking processes. You get everything you need to enforce DKIM best practices—automated, visible, and continuous.
Want to see it in action? Schedule a demo and learn how Valimail can simplify your DKIM key management, improve email deliverability, and strengthen your domain’s defenses.